|


| |
Introduction – history and the reason why
My first camera was an Exakta Varex IIa SLR with 3 prime lenses and a Weston
hand held exposure meter. Over the 30+ years I had this camera, I was very happy
with my shots, b&w, slide and negative, and my photograph methodology. When this
camera began to give up the ghost, I moved to Nikons and owned 2 SLRs in the
next 10 years. These had zoom lenses, automatic focus and exposure meters. It
took me some time to adjust to the modern technology and I adapted my methods. I
was quite happy to spend up to an hour setting up a shot of a mushroom, fiddling
with reflectors etc. and most of my photos came out as I wanted.
Then came the digital age and I’m racing through cameras – all Nikons – Coolpix
990, 4500, DSLR D70 and now D700 in the space of 6 years. In my ‘hayday’ I might have
taken a roll+ of film a day – now I click away and have once taken over 1500
shots in the space of 2 hours! The whole way I approach photography has changed.
No longer do I spend the hour taking the shot. Instead I rattle off the shots and
then spend the time post-processing it!
I now tend to believe the Camera’s exposure and only set the Aperture, or Speed,
for the effect I require. If in doubt I happily fire away a bracket burst, as it
costs nothing. I also take bracket shots to get the detail I require from
contrast subjects, knowing that I can merge the images together to create the
scene I visualised (I use a tripod for all ‘serious’ work).
My ‘new’ camera has a failing in that it only allows +/- 1ev bracket steps and
so I can wind up taking a lot of exposures (and using a lot of memory) for very
contrast subjects. I do not have a simpatico relationship with the camera's
metering and I
feel I am just using it without understanding the limitations of this digital
medium – both in the camera sensor and the computer display screen. As for getting the
prints I require – that is a further complication.
So I feel it is time I stopped, slowed down and get to grips with this medium. I
need to experiment to learn – the following records my journey and what I
learnt.
Basic idea
In order to learn, I think I need to know…
a) how well the sensor will capture the scene
b) how true this is to what I photographed
c) and how much latitude I have in ‘correcting’ the image
Camera dynamic range
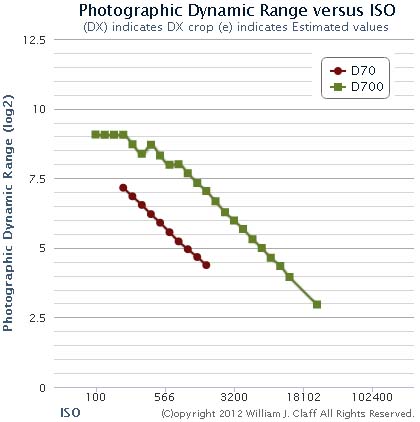
| I can look at reviews, which say that the D700 range is 9.5 to 12ev depending on
the contrast, or view a chart (opposite) which shows that the D700 is better than
the D70. But that does not really tell me what is going on – so I need to
see what is happening by creating an image of exposures. I limited the
exposure range to that given by the camera bracketing, as I reckon the
manufacturer knows how
good the sensor is.
I thought the way to check how the camera responds, is to create an
'Exposure Ruler'.
|
 |
So I took 9 +/-1ev bracket shots of an (out-of-focus) old grey card (using a tripod) - but any uniform
subject will do.
Sometimes I exposed as per meter and
at others times to get the 0ev exposure around 50% Lab Luminosity.I created the Exposure Ruler, by stacking all the images on top of
each other and cropped it 50x50pixels. I then enlarged the canvas size and
moved each layer along to create the ruler. One will then find that
the White Balance is not the same across exposures (I did not lock it) -
thus |
| |
 |
and so lastly I move into the Lab colour space and reduce the saturation
to zero - this makes sure (I think) that the Luminosity does not change.
Because of my lighting, and lens, the image was not entirely uniform and
there can be a variation of 1% in the L values.
To start the ball rolling I compared my 3 cameras...
|
Camera |
Exposure Ruler |
Coolpix 4500, produced in 2002
only 5 steps to give +/- 2ev |
 |
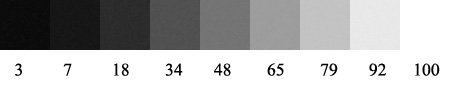
D70, produced in 2004
surprisingly still 5 steps to give +/- 2ev |
 |
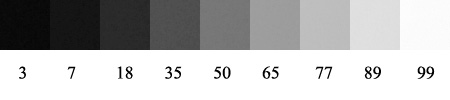
D700, produced in 2008
and 9 steps giving +/- 4ev |
 |
Note that middle grey is not the same for each camera and so this just gives
a flavour for the cameras, but I think we can see that the sensors and camera
processing has improved over the years!
But where is this getting me? There are hundreds of combinations of
settings on the camera which will change it's response.
I thought I would
home in on just a few for the D700.
|
Setting |
Exposure Ruler with Lab L values beneath |
This is the default settings
Picture Control set to Standard
and Active D-Lighting set to Auto |
 |
And with the Active D-Lighting set to High,
which, they say, helps preserve highlights |
 |
The default setting from a RAW capture
with no processing |
 |
| Now compare the above with a Photoshop generated 9 stop
wedge with equal steps |
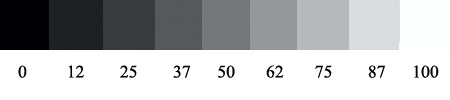 |
So the top end is not too bad, but the shadows are really
compressed compared to the fixed 9 stop (real world) wedge.
| We can move on to the next part of the journey |
|
But I did a little more research, which you can skip!
| Opposite is my plot of the D700 set to Neutral processing (red) and then
High Active D-Lighting setting (blue) - compared to the constant change
(thin black line). What we can now see is that compared to a constant change in exposure
tones, we have a classic 'S' curve applied to the image by the camera.
The curve is quite steep which results in 'punchier' out-of-camera JPG
image.
Opposite is shown the result from a review of the camera and I'm
pleased to see that I roughly agree with their jpg & default raw wedges
and am amazed how much one can get from processed raw.
|
 |
| The
Dpreview test says "The best result we could achieve was 11.6 EV which
is almost 5 (!) stops more than the default JPG output. It's no surprise
then that in our real world tests we managed to recover highlights that
had been hopelessly blown out". |
 |
however the curves that correspond to these wedges show that the best
raw must be a flat (non-contrast) image, as these curves demonstrate..
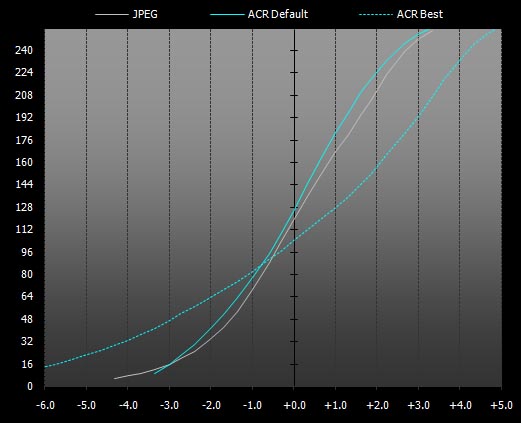
ACR Default: Exp. 0.0 EV, Blacks 5, Contrast +25, Curve Medium
ACR Best: Exp. -3.2 EV, Blacks 0, Brightness 150, Contrast -50, Linear
Curve |
| |
|
|
|