|
Having gathered lots of actions in my second year of
post-processing, I have now refined them to a much smaller set, in this my third
year, and included Dan Margulis's Picture Postcard Workflow items.
This page is basically for me, to backup, document and remember
what I learnt, but it may be useful to you too!
If you are not comfortable with the comments I made on my
second year page - forget this lot! - as there is little explanation.
I lay out my actions in rows of 7
columns and so there are a lot of empty ones – this format will probably not
suit you, so just delete them.
As before click
on a heading to download an action set, or click on the action name to see the
steps of the action (in a new window). If you have any questions,
then drop drop me a line
and I'll see if I can help you with them.
I have placed some of the specific PPW actions
in the right hand column of my layout. But because I'm no expert, I have
changed the methodology to keep the result of each step, rather than flatten the
image, to give me more latitude.
I found the PPW videos very difficult to
watch and especially annoying that the download images were
almost completely different from the video (because of size and colour
space). Although I loved some of the ideas, for non-critical images, 5 minutes is
much too long for me - so I tend to do a couple of passes of CurveMeister - the first
for colour casts and luminosity and the second for colour boost with L channel
mask. But I
always start with FocusMagic and go for conservative sharpening at the end - 2 minutes is nearer the mark.
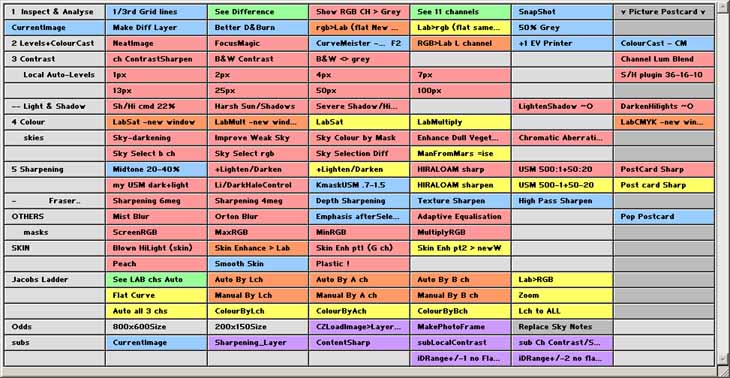
Actions are coloured to show in which
colour space they were designed to work.
|
Red
- RGB
|
Green
- inspection from any mode
|
|
Orange
- RGB to new Lab image
|
Mauve
- subroutines or special actions
|
|
Yellow
- Lab
|
Grey
- group names
|
|
Blue
- any
|
Darker Grey - Notes & the PPW
column
|
|
1 Inspect & Analyse
|
|
|
|
1/3rd Grid lines
|
Creates layer holding 3 grid lines
to help with cropping.
|
Edit>Transform>Scale to move and scale the grid
|
|
Difference
|
Shows
the differences from the original background layer
|
New window
|
|
2 Levels+ColourCast
|
|
|
|
NeatImage
|
‘CurrentImage’ & starts NeatImage
|
|
|
FocusMagic
|
‘CurrentImage’ & starts FocusMagic
|
|
|
CurveMeister - F2
|
‘CurrentImage’ & starts CurveMeister
|
|
|
RGB>Lab L channel
|
Places the RGB ‘luminosity’
channel as the Lab L channel, while retaining the original colours of the
image.
|
|
|
+1
EV Printer
|
Adjusts
image for Printer luminosity
|
|
|
Colour
cast - CM
|
‘CurrentImage’
layer, blend to Color & starts CurveMeister
|
Step 1 of PPW
|
|
3 Contrast
|
|
|
|
ch
ContrastSharpen
|
'Standard' Dan Margulis action .
Select the channel with best contrast – usually Green.
|
Beware of colour changes, especially red turning to black! Changing to ColorDodge can be interesting
|
|
B&W
Contrast
|
Subtle B&W contrast
action
|
Needs a fairly large blur radius
|
|
B&W
<> grey
|
Even more B&W control to
feather edges
|
|
Luminosity
Curve
|
To save key stokes!
|
|
Channel
Diffs
|
Creates Differences of the 3
channels
|
|
|
Channel
Lum Blend
|
Quick action to Apply Image on a channel
|
New layer set to Luminosity
|
|
Local Auto-Levels
|
|
|
1px
to 100px
|
AutoLevels over differently
sized areas of the image
|
Does the work in a separate image – but adds a named set on the
original for copying into.
|
S/H plugin 36-16-10
|
CS2 simulation of Conservative
Shadow/Highlight for PS7
|
New layer set to Luminosity
|
|
-- Light & Shadow
|
|
|
|
Sh/Hi
cmd 22%
|
Simulates the CS2+ tool, but with
more control
|
Creates a new set (Opacity @ 22%)
Need
to set a good B&W mask
|
|
Harsh Sun/Shadows
|
'Standard' Dan Margulis action
using Luminosity
|
Watch for halos
|
|
Severe
Shadow/HiLight
|
This is quite crude, but does not
produce halos
|
|
|
LightenShadow ~O
|
'Standard' Dan Margulis action
using Inverted Overlay layer of the selected channel, constrained by the
original layer
|
The Overlay layer needs a
hefty blur
|
|
DarkenHiLights ~O
|
|
4 Colour
|
|
|
|
LabSat -new window
|
Standard
Lab saturation from RGB
|
Opacity at 75% for the set
|
|
LabMultiply -new window
|
Use
to increase weight overall, or in the lighter half of the image, while intensifying
colours - from RGB
|
|
|
LabSat
|
Standard
Lab saturation
|
The A & B channel curves are set to 43:127,-42:-127 &
51:127,-51:127
|
LabMultiply
|
Standard Lab Multiply with 2 selections offered for
Mask
|
A curve adjustment layer is added in case
Luminosity needs changing.
|
|
LabCMYKMultiply -new window
|
A Dan Margulis suggestion
|
Assign a low gamma profile, convert to Bogus CMYK and then curve to
get a full shadow. Then runs LabMultiply
|
|
skies
|
|
|
|
Sky-darkening
|
Uses the Blue channel to darken
the sky, with an optional blur
|
Lowering opacity of Foliage layer will lighten the greens.
|
|
Improve Weak Sky
|
A Dan Margulis suggestion, which
should always improve a weak sky.
|
Watch for noise in the sky and adverse effects on other areas of the image, which may need Masking.
|
|
Enhance Dull Vegetation
|
A Dan Margulis suggestion, which
normally works, but may alter other colours, so inspect carefully and
follow the instructions!
|
Adds an adjustment Channel Mixer layer with the Green channel set to
130% Green and –30% Blue.
|
|
Chromatic Aberration
|
Attempts to remove colour fringing
|
|
Sky Select b ch
|
Suck
& see
|
|
|
Sky Select rgb
|
|
Sky Selection Diff
|
|
ManFromMars
=ise
|
A mad idea – using Equalise
|
Reduce opacity like stink!
|
|
5 Sharpening
|
|
|
|
Midtone 20-40%
|
This applies contrast to the
mid-tones. The Opacity is set
to 30% as one normally uses between 20% and 40%
|
Applies a HighPass filter of 50
pixels. The ‘This Layer’ of BlendIf is set to 50/70 and 185/205 to
limit the effect to the midtone.
Beware of halos.
|
|
+Lighten/Darken
|
The above action may be modified
by immediately playing this action, which allows further lighten/darken
adjustment
|
Set the Opacity high-ish in the MidTone layer so you have something to back off from.
|
|
+Lighten/Darken
|
|
PostCard Sharp
|
A Dan Margulis action,
bit OTT for me
|
Very complex – so in new window.
Copy Layer Set back to original window
|
PostCard Sharp
|
|
USM 500:1+50:20
|
Quite strong – it will need a
mask and lower opacity
|
|
|
USM 500-1+50-20
|
|
High
Pass
Sharpen
|
Different approach – using
High
Pass
with a Hard Light blend
|
High pass set at 3 pixels
|
|
my
USM dark+light
|
My
sharpening action - excellent at halo & threshold control.
Set Threshold = 0 in USM dialog.
|
Requires applying the unsharpened image to create difference masks,
which can then be curved for Threshold and more
|
|
Li/DarkHaloControl
|
Halo control with 2 layers
set to Lighten and Darken blends
|
|
|
HIRALOAM sharp
|
High Radius Low Amount – try
50>100:40>65
|
|
|
HIRALOAM sharpen
|
|
KmaskUSM .7-1.5
|
A Dan Margulis action, adjust the Unsharp Mask between
0.7 and 1.5 pixels
|
If the image is not sharp enough, lighten the curve midpoint or darken it if too sharp.
When happy copy the layer back to the original image and delete the duplicate image.
|
|
-
Fraser..
|
(needs CBsActions subroutines)
|
from Bruce Fraser book "Image Sharpening with CS2"
|
|
Sharpening 6meg
|
Suggested sharpening for 6meg
images + content
|
|
|
Sharpening 4meg
|
Suggested sharpening for 4meg
images + content
|
|
|
Depth Sharpening
|
Use Mask to simulate depth of
field
|
USM of 500%, 4 pixels & HighPass of 25 pixels
|
|
Texture Sharpen
|
Brings out detail in flat surfaces
|
6 applications of USM
|
|
OTHERS
|
|
|
|
Mist Blur
|
Adds a rich glow to images
|
|
|
Orton Blur
|
Refined Orton effect with facility
to alter the blur and sharp layers
|
A default blur of 20 pixels is added – which may be redefined by going back 2 history steps.
|
|
Pop
postcard
|
Quick Dan Margulis idea to
‘pop’ a well exposed image
|
Grey layer controls impact of effect, which can be modified by Curving and altering the opacity of the VividLight layer.
For more control, reduce opacity of 50% Grey layer to 50% or so and use a flat ‘Jacob Ladder’ Curve!
|
|
Replace Sky Notes
|
In case I forget!
|
|
|
Emphasis after
Selection
|
Adds a slight darkening to edge of
image.
Select the main area
first on an image layer.
|
Inverses the selection and then Gaussian blurs it by 150 pixels. Adds
this as a mask to a solid fill layer with Multiply blend.
|
|
Adaptive
Equalisation
|
Finds fantastic detail
|
CurrentImage + Reindeer Graphics Adaptive Equalization plugin
|
|
Masks
|
Useful Screen, Max, Min & Multiply
masks on RGB channels
|
|
|
SKIN
|
|
|
|
Blown HiLight (skin)
|
Uses Lab impossible colours to add
colour back into blown highlights
|
|
|
Skin Enhance > Lab
|
A Dan Margulis action, which
enhances the skin colour, but may muck up other colours so a mask and
opacity change will probably be required
|
Need to reduce Opacity of layers
|
|
Skin Enh pt1 (G
ch)
|
Slightly improves the skin tones
|
Applies the Green channel to a new layer of the current visible image
in Luminosity blend.
|
|
Skin Enh pt2 > newW
|
Enhances the shin
colour
|
Overlays the A and B channels on themselves.
|
|
Peach
|
Changing Profiles to help skin
colours
|
|
|
Jacobs Ladder
|
- there is a page describing this
technique
|
|
|
See LAB chs Auto
|
Run this first to see which
Channel to use as the Controlling channel. It will create
a new window showing the 3 Lab channels side by side as they will be
used in the following 'Auto By..' actions. Delete this image when
you have inspected it.
|
|
Auto By Lch
|
These 3 actions will create the
Layers using either the L, a or b channel to control
the adjustments. They will give you the option of blurring the
channel, which may be necessary for a or b, to get a smooth
transition of colour. The actions include an AutoLevels adjustment
on the controlling channel to make sure the entire width of the curve
dialog is useable. If you do not like the result, then use the
'Manual By' actions.
|
|
Auto By A ch
|
|
Auto By B ch
|
|
Lab>RGB
|
This action will convert the Lab
image back to RGB for you.
|
|
|
Flat Curve
|
This creates a grouped Curve
adjustment Layer and sets all the 3 channel curves as horizontal lines.
|
|
Manual By Lch
|
These actions allow you to curve
the appropriate channel, rather than have AutoLevels applied - useful for
some images. Note it uses some actions from my standard set (CBactions)
which must therefore be present.
|
|
Manual By A ch
|
|
Manual By B ch
|
|
Zoom
|
Creates a controlling layer at 80%
opacity
|
|
|
Auto all 3 chs
|
This action creates 3 sets of
adjustment layers in case you need different controlling channels.
Rus uses this, but being simple minded I tend to just play with one
adjustment at a time. Note this must be started when the image is
already in Lab mode.
|
|
ColourByLch
|
These actions are present in case
you want an addition Jacob layers based on the adjustments you have made
so far - so the image will already be in Lab mode
|
|
ColourByAch
|
|
ColourByBch
|
|
Lch to ALL
|
Use this action if you want a
different sort of controlling image (perhaps from RGB space) - place your
chosen image into the L channel before running it. You will then
need to add the Flat curve and Zoom layers.
|
Date this page was last changed:- 28/01/2010
|