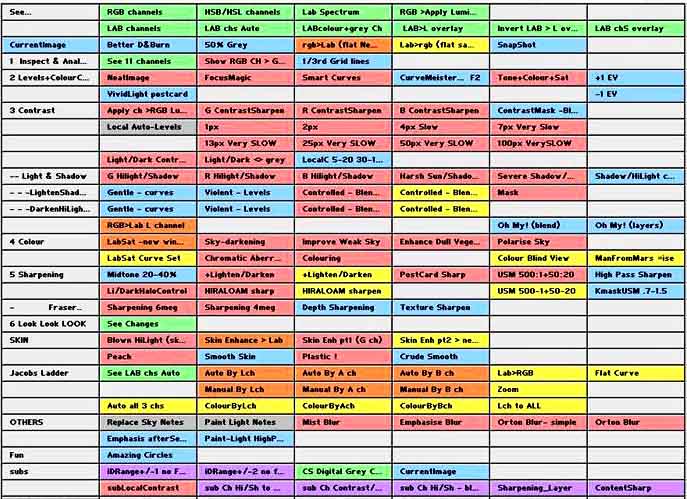
|
These are actions that I have made or
gathered, over the last couple of years, to help me in my post-processing. Some
of them are very basic and only present to remind me of different techniques as
my little grey cells are not as cracked up as they should be!
I am sharing this page in the hope
that it may be of interest to people who are attempting to understand
some of the thinking of Dan Margulis or have been on the CurveMeister
course. Participating in this interactive course, with fellow
students, is worth a thousand books and I am extremely indebted to Greg and Mike
for all the help and guidance they have given me. Putting these actions on
the web is also a quick way for me to inspect what they do and is an excellent
way of ensuring that I do not loose them if my machine crashes!
If
you do not understand, or appreciate, what the Dark
Sky action is doing or my tutorial
on B&W conversion, then I think you will get a bit frustrated working
out which would be useful to you - but just inspecting what they do is
interesting and a way of learning.
For instance try one of the
first two actions in the Contrast set on an image with a bright red flower (use
the Green channel in Darken mode and then adjust the opacity of the new layer) -
you will get a Wow buzz reaction!
I lay out my actions in rows of 7
columns and so there are a lot of empty ones – this format will probably not
suit you, so just delete them.
Click
on a heading to download an action set, or click on the action name to see the
steps (in a new window). If you have any questions,
then drop drop me a line
and I'll see if I can help you with them (but remember I'm a [slow] learner!).
They are divided into groups which should follow the basic workflow - thus...
In general the actions can be run with
any number of image or adjustments layers present.
It is normally best to have the top layer selected before starting the
action. Selections
are usually ignored and so a mask will be required to limit the effect if
necessary – so either paint on a mask or make a selection and then Layer>Add layer Mask>Reveal Selection.
Remember to alter the Opacity of the
Layers and maybe use Masks and BlendIf (especially in Lab mode) to modify the
effects.
Actions are coloured to show in which
colour space they were designed to work.
|
Red
- RGB
|
Green
- inspection from any mode
|
|
Orange
- RGB to new Lab image
|
Mauve
- subroutines or special actions
|
|
Yellow
- Lab
|
Grey
- group names
|
|
Blue
- any
|
Darker Grey - Notes
|
|
See…
|
- useful set to inspect from different perspectives
|
|
|
RGB
channels
|
Shows the 3 RGB channels as masks
|
|
|
HSB/HSL
channels
|
Needs a plugin to work – use
CurveMeister instead!
|
|
|
Lab
Spectrum
|
Creates a Lab image to experiment
with
|
|
|
RGB
>Apply Luminosity
|
Applies the 3 RGB channels as
Luminosity masks (equivalent to Ch Contrast/Sharpening)
|
|
|
LAB
channels
|
Shows the Lab channels as masks
|
|
|
LAB
chs Auto
|
Shows the Lab channels after
applying AutoLevels to each channel
|
|
|
LABcolour+grey
Ch
|
Shows the Lab channels in their
colours and beneath as masks
|
|
|
LAB>L
overlay
|
Applies the 3 Lab channels
overlaid on the Luminosity channel
|
|
|
Invert
LAB > L overlay
|
Applies the 3 Lab channels
Inverted and overlaid on the Luminosity channel
|
|
|
LAB
chS overlay
|
Applies the 3 Lab channels
overlaid on to their own channels
|
|
|
CurrentImage
|
Creates a layer of the visible
image so far
|
Creates a new layer & ALTkey + Layer> Merge Visible.
|
|
Make
Diff Layer
|
This
is a great way to capture the changes in a Difference layer - do your
sharpening as *differences* from the current image, storing them on these
layers. Then you can base each correction on that current image, and turn
them on/off independently, or mask, etc..
|
Basically create a Current Image and then uses Apply Image, using the lower
layer as the source. Blending = Subtract, Opacity = 100%, Scale = 2,
Offset = 128 and sets the blend to Linear Light. A more
refined Jacob Rus action (for rgb or lab), based on this idea - see the
Stop message.
|
|
Better D&Burn
|
Creates 2 Luminosity Curve layers
to play with – adjust curve & then Invert Mask and paint.
|
|
|
50% Grey
|
Creates a dodge/burn layer in
SoftLight blend. For great
effect try Overlay
|
Layer>
New Layer…>
color=Gray + SoftLight + Fill 50%
|
|
Rgb>Lab (flat New W)
|
Creates a new image & sets the
mode to Lab colour space (flattening it in the process)
|
|
|
Lab>rgb (flat same W)
|
Flattens and converts the Lab
image to RGB
|
|
|
SnapShot
|
Creates a History snapshot
|
|
|
1 Inspect & Analyse
|
- use the 1/3rd before cropping
|
|
|
See 11 channels
|
Creates a new image with the
following 3 rows (not needed with CM!)
Original L A B
R G B desaturated
C M Y K
|
|
|
Show RGB CH > Grey
|
Shows the 3 RGB channels relative
to mid-grey (128), I find this helps when playing with channels as I'm not
very good at recognising mid-grey.
|
|
|
1/3rd Grid lines
|
Creates layer holding 3 grid lines
to help with cropping.
Edit>Transform>Scale to
move and scale the grid
|
Uses the custom shaped tool in a new layer at 50% opacity
|
|
2 Levels+ColourCast
|
- I always use one, or more, of these to get the ball rolling
|
|
|
NeatImage
|
Creates a new ‘CurrentImage’
layer & starts NeatImage
|
|
|
FocusMagic
|
Creates a new ‘CurrentImage’
layer & starts FocusMagic
|
|
|
Smart Curves
|
Creates a new ‘CurrentImage’
layer & starts SmartCurve
|
|
|
CurveMeister - F2
|
Creates a new ‘CurrentImage’
layer & starts CurveMeister
|
|
|
Tone+Colour+Sat
|
Creates 3 separate adjustment
Curves for Tones, Colour & Saturation
The Saturation layer is set hidden & S-curved!
|
|
|
+1 EV
|
Creates an adjustment layer to
increase the exposure by roughly 1 stop
|
Adds a curves adjustment layer with Screen blend
|
|
VividLight postcard
|
Quick Dan Margulis idea to
‘pop’ a well exposed image.
Grey layer controls impact of effect, which can be modified by Curving and
altering the opacity of the VividLight layer.
For more control, reduce opacity of 50% Grey layer to 50% or so and use a
flat ‘Jacob Ladder’ Curve!
|
Creates a new layer from the visible image in Vivid Light blend,
grouped with a Curve adjustment + 50% grey layer at 90% opacity.
|
|
-1 EV
|
Creates an adjustment layer to
decrease the exposure by roughly 1 stop
|
Adds a curves adjustment layer with Multiply blend
|
|
3 Contrast
|
- a very handy set
|
|
|
Channel Contrast
|
Quick action to apply a channel to
alter contrast and sets new layer to
Luminosity blend. Great for adding contrast to bright or dark areas
(better than below!).
|
Creates a new layer from the visible image in Luminosity blend and
stops & then runs Image>Apply Image
|
|
Apply ch >RGB Luminosity
|
Quick action to apply a channel in
Luminosity blend to a new layer
|
Creates a new layer from the visible image in Luminosity blend and
runs Image>Apply Image
|
|
G ContrastSharpen
|
“Standard' Dan Margulis action .
Select the channel with best contrast – usually Green.
Beware of colour changes, especially red turning to black!
Changing to ColorDodge can be interesting.
|
The selected channel is added as an Overlay blend layer with the
‘This Layer’ of BlendIf set to 0/0 70/255 – thereby restricting the
highlights.
|
|
R ContrastSharpen
|
|
B ContrastSharpen
|
|
ContrastMask -Blur 10+
|
All channel contrast mask - only
run from an image layer.
You will need to then Filter>
Blur> Gaussian Blur 10-30 pixels or more!
Try Vivid Light blend mode for fun.
|
Creates a layer from a Desatured Inverted copy of the image layer and
sets the blend mode to Overlay.
|
|
Local Auto-Levels
|
|
|
|
1px
|
A fantastic idea and very
effective on dull images - equivalent to doing AutoLevels over differently
sized areas of the image rather than the whole of it.
Sometimes PS fails to select correct window when multiple images are
present – no idea why!!
|
Does the work in a separate image – but adds a named set on the
original for copying into.
|
|
2px
|
|
4px Slow
|
|
7px Very Slow
|
|
13px Very SLOW
|
|
25px Very SLOW
|
|
50px Very SLOW
|
|
100px VerySLOW
|
|
Light/Dark Contrast
|
Subtle B&W contrast action,
needs a fairly large blur radius.
|
|
|
Light/Dark <> grey
|
Even more B&W control to
feather edges
|
|
|
LocalC 5-20 30-100
|
Quick Local Contrast.
Creates a new layer from the visible image and applies an Unsharp Mask of
13% with 70 pixel radius.
If this is not sufficient, then undo the Unsharp step and try between
5-20% and 30-100 pixels.
|
Creates a new layer from the visible image in overlay blend and then
applies an UnSharp Mask of 13% with 70 pixels.
|
|
Shadow/HighLight
|
SImulates the CS2+ tool, but with
more control
|
Creates a new set (Opacity @ 22%) with 2 adjustment curves.
Need
to set a good B&W mask
|
|
-- Light & Shadow
|
- you should inspected the channels first
|
|
|
G
Hilight/Shadow
|
“Standard' Dan Margulis action .
Select the channel with best contrast – usually Green.
You will need to Filter> Blur> Gaussian Blur the 2 ‘Inv Ch to Blur’
layers to Lighten and Darken the image.
How much to blur is fairly sensitive – watch dark/light edges if
you use a large blur amount.
Switch off the ‘Ch Lighten’
layer while you do the darkening. Note the Darken layer’s opacity is set
at 50%.
|
Creates 2 layers of the current visible image (with Darken and Lighten
blends) and then places an inverted copy of the selected channel, as a
grouped layer, above each of them in Overlay blend.
|
|
R
Hilight/Shadow
|
|
B
Hilight/Shadow
|
|
Harsh Sun/Shadows
|
“Standard' Dan Margulis action
using Luminosity. But, for example, in flesh tone images, making a
selection based on the red channel will probably work better.
Watch for halos and you may need to apply a curve to restore the full
range.
|
|
|
Severe
Shadow/HiLight
|
This is quite crude, but does not
produce halos.
|
|
|
Shadow/HiLight cmd
|
Simulates the Shadow/HighLight CS2
adjustment giving 2 Level adjustment layers.
Adjust mid point of Levels to control shadow/highlight.
|
Uses BlendIF sliders to control the Levels.
|
|
- - -LightenShadow >
|
|
|
|
Gentle - curves
|
Adds a Curve adjustment layer in
Screen blend.
Move Curve diagonal
|
|
|
Violent - Levels
|
Adds a Level adjustment layer in
Screen blend.
|
|
|
Controlled - BlendIF
|
Reasonable Shadow lightener –
just reduce Opacity of layer
|
Creates a new layer from the visible image in Screen blend, with
BlendIf slider set to 0:0 & 0:255..
|
|
Controlled - BlendIF
|
Reasonable Shadow lightener –
just reduce Opacity of layer
|
Creates a new layer from the Lightness channel in Screen blend, with
BlendIf slider set to 0:0 & 0:255.
|
|
Mask
|
Crude shadow lightener – only
run from an image layer.
Change Opacity to suit.
Try Overlay, SoftLight or
ColorDodge modes, to add colour to the shadows.
|
Selects Highlights (Select>
ColorRange…>Highlight), expands by 5 pixels, inverses the
selection and feathers it by 10 pixels.
This is then used to form a Mask for a new layer copy of the image,
with blend mode = Screen .
|
|
- - -DarkenHiLights >
|
|
|
|
Gentle
- curves
|
Adds a Curve adjustment layer in
Multiply blend.
Move Curve diagonal
|
|
|
Violent
- Levels
|
Adds a Level adjustment layer in
Multiply blend.
|
|
|
Controlled - BlendIF
|
Reasonable HighLight Darkener –
just reduce Opacity of layer
|
Creates a new layer from the visible image in Multiply blend, with
BlendIf slider set to 0:255 & 255:255..
|
|
Controlled - BlendIF
|
Reasonable HighLight Darkener –
just reduce Opacity of layer
|
Creates a new layer from the the Lightness channel in Multiply blend,
with BlendIf slider set to 0:255 & 255:255.
|
|
RGB>Lab L channel
|
Places the RGB ‘luminosity’
channel as the Lab L channel, while retaining the original colours of the
image (because RGB will have changed them!).
Useful when using RGB for Tone correction in images requiring a delicate
touch.
|
|
|
Oh My! (blend)
|
For massive adjustment to dull
image.
Play with Opacity, Mask and
BlendIf for effects
|
Adds 2 Curve adjustment layers with Multiply and Overlay blends.
|
|
Oh My! (layers)
|
As above, but creates images
layers instead of adjustment layers – only run from an image layer.
You can paint on the images as
well as the masks
|
Adds 2 image layers with Multiply and Overlay blends.
|
|
4 Colour
|
- not often used, as CurveMeister is better!
|
|
|
LabSat -new window
|
Creates a new Lab image and
saturates the colour.
This will probably be much too
much, but you can reduce it using the Opacity and individually alter the
colour ratio using BlendIf sliders on the A & B channels – or alter
the curves.
|
The image is flattened in RGB space before converting to Lab.
A new Set is created with 2 adjustment layers for the channels.
The A & B channel curves are then set to 55,0 & 200,255 to
saturate the colours
|
|
Sky-darkening
|
Uses the Blue channel to darken
the sky, with an optional blur.
Lowering opacity of Foliage layer will lighten the greens.
|
Creates on Overlay inverted Blue channel layer under a copy of the
image set to Darken blend
|
|
Improve Weak Sky
|
A Dan Margulis suggestion, which
should always improve a weak sky. Watch for noise in the sky and
adverse effects on other areas of the image, which may need Masking.
|
Uses the Red channel
|
|
Enhance Dull Vegetation
|
A Dan Margulis suggestion, which
normally works, but may alter other colours, so inspect carefully and
follow the instructions!
|
Adds an adjustment Channel Mixer layer with the Green channel set to
130% Green and –30% Blue.
|
|
Polarise Sky
|
Allows colour enhancement –
select (sky) area first.
You can then select colour by
double-click on adjustment layer.
|
Adds a Fill layer with Color Burn blend.
|
LabSat
- 1 Curve
|
Creates the Colour saturation
adjustment layers, in a single adjustment layer
|
|
|
Chromatic Aberration
|
Attempts to remove colour fringing
|
|
|
Colouring
|
Creates a layer for colour
painting
|
Adds an empty layer in ColorDodge blend.
|
|
LabSat Curve Set
|
Creates the Colour saturation
adjustment layers, as in the LabSat action (above)
|
|
|
Colour Blind View
|
Adjusts the A Lab channel to
simulate what a colour blind person may see
|
|
|
ManFromMars
=ise
|
A mad idea – using Equalise to
produce a vivid Man from Mars. Reduce
opacity like stink!
|
|
|
5 Sharpening
|
- the difficult one, because it depends on Output size/media
|
|
|
Midtone 20-40%
|
This applies contrast to the
mid-tones. The Opacity is set
to 30% as one normally uses between 20% and 40%.
Beware of halos.
|
Creates a new layer from the visible image in overlay blend.
Applies a HighPass filter of 50
pixels. The ‘This Layer’ of BlendIf is set to 50/70 and 185/205 to
limit the effect to the midtone.
|
|
+Lighten/Darken
|
The above action may be modified
by immediately playing this action, which allows further lighten/darken
adjustment. It is advisable to
set the Opacity high-ish in the MidTone layer so you have something to
back off from.
|
For RGB, creates two new layers from the visible image and changes
their blend modes to Lighten and Darken.
Otherwise duplicates the Midtone layer and uses to BlendIf sliders to
only effect Lightening or Darkening.
|
|
+Lighten/Darken
|
|
PostCard Sharp
|
A Dan Margulis action, which is
excellent at automating sharpening.
|
Very complex – so in new window.
|
|
USM 500:1+50:20
|
Quite strong – it will need a
mask and lower opacity.
|
Applies 2 UnSharp masks on a new luminosity layer from the visible
image.
|
|
High
Pass
Sharpen
|
Different approach – using
High
Pass
with a Hard Light blend
|
High pass set at 3 pixels
|
|
my
USM dark+light
|
My
sharpening action - excellent at halo & threshold control.
Set Threshold = 0 in USM dialog.
|
Requires applying the unsharpened image to create difference masks,
which can then be curved for Threshold and more
|
|
Li/DarkHaloControl
|
Simple Halo control with 2 layers
set to Lighten and Darken blends
|
|
|
HIRALOAM sharp
|
High Radius Low Amount – try
50>100:40>65
|
|
|
HIRALOAM sharpen
|
|
USM 500-1+50-20
|
Quite strong – it may need a
mask and lower opacity.
|
Applies 2 UnSharp masks to the L channels of a new
layer from the visible image.
|
|
KmaskUSM .7-1.5
|
Adjust the Unsharp Mask between
0.7 and 1.5 pixels.
Then on the last adjustment if the
image is not sharp enough, lighten the curve midpoint or darken it if too
sharp.
When happy copy the layer back to
the original image and delete the duplicate image.
|
Creates an image from an Inverted Black channel of the CMYK colour
space, then apply Auto levels and a Gaussian blur of 2 pixels and copies
it.
In a duplicate flattened new image, a Luminosity layer of the visible
image is added with BlendIf slider set to 5/10 and 242/250.
Then gets a Selection (Cntrl+Alt) on the copied image of the Black
channel. Adds this as a mask
to the new layer and applies an UnSharp Mask before presenting a Curve
adjustment on the mask.
|
|
-
Fraser..
|
(needs CBsActions subroutines)
|
from Bruce Fraser book "Image Sharpening with CS2"
|
|
Sharpening 6meg
|
Suggested sharpening for 6meg
images + content
|
|
|
Sharpening 4meg
|
Suggested sharpening for 4meg
images + content
|
|
|
Depth Sharpening
|
Use Mask to simulate depth of
field - USM of 500%, 4 pixels & HighPass of 25 pixels.
|
|
|
Texture Sharpen
|
Brings out detail in flat surfaces
|
6 applications of USM
|
|
Perceptive
Sharpen
|
Sometimes helps when an image has
been enlarged
|
Applies noise in new a 50% Soft Light layer
|
|
6 Look Look LOOK
|
- to remind me to check what I've done
|
|
|
Difference
|
Shows
the differences from the original background layer, using the Make Diff
Layer logic
|
Takes a copy of the Background layer, duplicates the image with
flattening. The adds the original background layer and runs a
modified Make Diff Layer action.
|
|
See Changes
|
Attempts to show difference
between before and after.
The bottom layer of the new window
is the ‘after’ image.
|
Takes a copy of the Background layer, duplicates the image with
flattening. The adds the original background as a Difference blend layer
and finally changes the contrast using Levels.
|
|
SKIN
|
- I only tend to use the first two
|
|
|
Blown HiLight (skin)
|
Uses Lab impossible colours to add
colour back into blown highlights
|
|
|
Skin Enhance > Lab
|
A Dan Margulis action, which
enhances the skin colour, but may muck up other colours so a mask and
opacity change will probably be required.
Need to reduce Opacity of layers
|
Does Skin Enhance pt1 and pt2 – below in a new Lab image.
|
|
Skin Enh pt1 (G
ch)
|
Slightly improves the skin tones
|
Applies the Green channel to a new layer of the current visible image
in Luminosity blend.
|
|
Skin Enh pt2 > newW
|
Enhances the shin colour.
|
Overlays the A and B channels on themselves.
|
|
Peach
|
Changing Profiles to help skin
colours
|
|
|
Smooth Skin
|
Attempts to blur just the skin –
but a mask maybe needed to exclude other elements in the picture. Paint on
the masks (white for Makeup & black for Details) to add the effects
|
Creates a new layer from the visible image containing selected
HighLights, feathers by 2 pixels. Suggests a gaussian blur of 5 pixels
|
|
Plastic !
|
Makes skin into plastic, with
reduce opacity
|
|
|
Crude Smooth
|
Attempts to smooth the skin with
no selections
|
|
|
Jacobs Ladder
|
- there is a page describing this
technique
|
|
|
See LAB chs Auto
|
Run this first to see which
Channel to use as the Controlling channel. It will create
a new window showing the 3 Lab channels side by side as they will be
used in the following 'Auto By..' actions. Delete this image when
you have inspected it.
|
|
Auto By Lch
|
These 3 actions will create the
Layers using either the L, a or b channel to control
the adjustments. They will give you the option of blurring the
channel, which may be necessary for a or b, to get a smooth
transition of colour. The actions include an AutoLevels adjustment
on the controlling channel to make sure the entire width of the curve
dialog is useable. If you do not like the result, then use the
'Manual By' actions.
|
|
Auto By A ch
|
|
Auto By B ch
|
|
Lab>RGB
|
This action will convert the Lab
image back to RGB for you.
|
|
|
Flat Curve
|
This creates a grouped Curve
adjustment Layer and sets all the 3 channel curves as horizontal lines.
|
|
Manual By Lch
|
These actions allow you to curve
the appropriate channel, rather than have AutoLevels applied - useful for
some images. Note it uses some actions from my standard set (CBactions)
which must therefore be present.
|
|
Manual By A ch
|
|
Manual By B ch
|
|
Zoom
|
Creates a controlling layer at 80%
opacity
|
|
|
Auto all 3 chs
|
This action creates 3 sets of
adjustment layers in case you need different controlling channels.
Rus uses this, but being simple minded I tend to just play with one
adjustment at a time. Note this must be started when the image is
already in Lab mode.
|
|
ColourByLch
|
These actions are present in case
you want an addition Jacob layers based on the adjustments you have made
so far - so the image will already be in Lab mode
|
|
ColourByAch
|
|
ColourByBch
|
|
Lch to ALL
|
Use this action if you want a
different sort of controlling image (perhaps from RGB space) - place your
chosen image into the L channel before running it. You will then
need to add the Flat curve and Zoom layers.
|
|
OTHERS
|
- bits and bobs
|
|
|
Replace Sky Notes
|
in case I forget!
|
|
|
Paint Light Notes
|
|
Mist Blur
|
Adds a rich glow to images
|
|
|
Emphasise Blur
|
|
|
|
Orton Blur- simple
|
Allows a simple Orton effect by
applying a Gaussian blur of between 20-30 pixels to the top layer.
|
Creates 3 layers from the visible image. Top layer is set to Multiply
and the middle to Screen.
|
|
Orton Blur
|
Refined Orton effect with facility
to alter the blur and sharp layers. A
default blur of 20 pixels is added – which may be redefined by going
back 2 history steps.
|
Multiple steps – basically over-exposes image by 2 stops and then
create a sharp and blurred layer with grouped Level adjustments to alter
exposure.
|
|
Emphasis after
Selection
|
Adds a slight darkening to edge of
image.
You need to select the main area
first on an image layer.
|
Inverses the selection and then guassian blurs it by 150 pixels. Adds
this as a mask to a solid fill layer with Multiply blend.
|
|
Paint-Light HighPass
|
Adds light around objects in a new
window – not very good! Must
be started from an Image Layer
|
Create a new image, duplicates the top layer in Overlay blend and
applies a
High
Pass
filter at 21.1 pixels.
|
|
Fun
|
|
|
|
Amazing Circles
|
Switches selection between Polar
to Rectangular coordinates
|
|
Date this page was last changed:- 18/10/2009
|