Step 2 |
|||||||
|
|||||||
Next page |
Step 2
Well as regards gluing - Bob is your uncle. I started with the Drums, but just as I was about to follow my instructions I got some advice from Jim Hansen (via a forum). He pointed out that as drill bits can wander it would be a good idea to make sure only the smallest amount of the drill should stick out of the chuck. Seemed like a very good point.
So instead of trying to drill everything at once, I did each piece separately. My crude compass templates gives me a scaling factor of 10:1, so assuming I can position it to easily within half a line's width, I should be accurate to at least 0.01mm (.004"). If we add in the drill wobble (0.05mm in 12mm), from my earlier experiments, we get a total variation of 0.06mm - 15thou! What a coincidence.
So the drill wobble is the largest factor. I guess this is acceptable for the drum, but I will stick with my original idea for the other connectors.
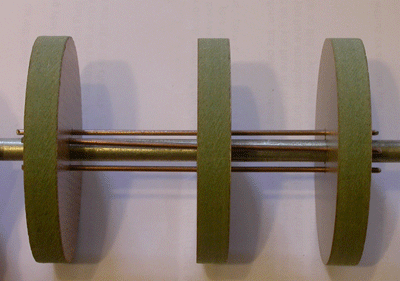
Horror upon horrors, the 4 connectors corkscrew anti-clockwise around the axis. I only found this out after having drilled all the connectors for the 9 pieces that make up this sub-assembly and then cut them all out.
See how the rods twist around the axis. I've taken 4 pictures turning the assembly by 90 degrees.
But when I joined the 3 drum end pieces, they all align up okay, with no binding on the shaft. I used a spare rod that was slightly larger than the 6mm brass rod that will be in the clock as a double check. All very strange.
I've at last deduced why. The drill must have mis-settled on the stand by a fraction, making the bit non-vertical.
First time that has happened and just as I'm starting for real!
What a waste of time.
I'm not a happy bunny, but this will have to do as I'd like to get on. I will come back and redo this piece as it is a completely separate assembly - but this one will be fine for initial testing.
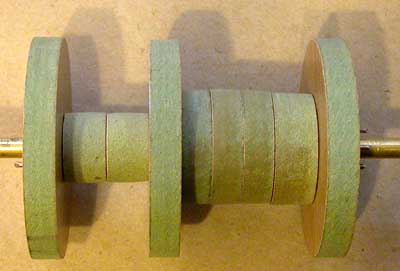
The above shows it joined together. The weight driving drum is on the left and the windlass winder on the right.
I can twist the two end pieces relative to each other, so that the drum pieces need gluing together to stop this movement as there is too much play in so many joined pieces. This amount of play was caused by me drilling out the connector holes to ease the assembly - it was such a very tight fit otherwise and took a lot of effort to join the 9 pieces. Certainly once pushed together, unless there was an end of a connecting rod to get hold of with the pliers, I would never have been able to separate the drum elements. Glue together? Back to the same old problem!
I've over-bored the drum arbor holes to 7mm diameter and done the same to 70% of the thickness of the drum ends, and one could easily feel the friction decrease from having 90mm in contact with the arbor to about 6mm . The pieces really need sanding down before final assembly, but what the hell, this will do, even the wonky windlass drum!
So I'm still learning, on the job. When will I get anything right the first time? I would just hate to cut the Minute wheel twice. Perhaps Jim Hansen was right when he said "It appears that you've decided that this thing is going to be built with about the absolute minimum of tools, particularly, appropriate tools! Why is it that you've allowed use of sandpaper??? You should make your own files and use only them for all cutting and smoothing operations! (HA!)". I'll think about updating my tools if I really get bitten by the bug - I must say I'm not looking forward to struggling with 80 teeth.
On the plus side I got some cheap scroll saw blades, which seem to last a wee bit longer and cut moderately easily in a straight line.
Next page