Revisiting - Instructions |
|||||
|
|||||
Next page |
.
Revisiting - Instructions
I shall be printing all the templates and therefore the pinion of an interlocking wheel will be included on the same sheet, just to avoid any scaling errors. This means that the pieces must be cut out in a fixed order, as the pinions will be printed inside the spokes of the wheel it meshes with. It is imperative that the connecting pin holes (used instead of glue) are identical for the pieces being joined together.
The order of the steps is Minute, Movement and Crown.The drum is an independent unit and can be done at any time after the Minute wheel spokes have been cut.
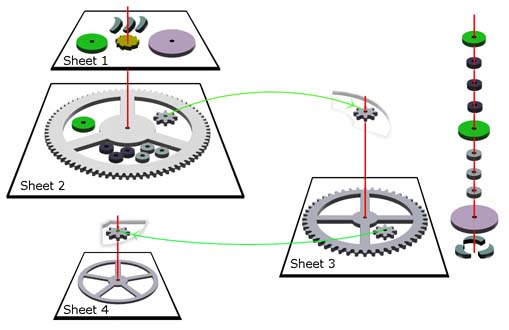
The diagram shows the logical templates and cutting order.
The red vertical lines represent the connecting pins. Both the arbor and their connecting holes must be drilled at the same time. The pieces must also be held together during this operation - by another set of holding pins (as done during the Construction Wear test).
General Steps...
- Join the 2 pieces (sunny side up) together with 3 temporary holding pins [see Ratchet variation]
- Drill the Arbor hole
- Double-sided sticky tape a 90 degree paper template on the bottom piece of wood, then cut out to reveal the hole
- Prepare a spare piece of wood and brass bar to act as a temporary arbor
- Place the 2 pieces on the temporary arbor and pack with paper for a tight fit
- Position drill at correct distance for Connecting pins and clamp spare piece of wood down
- Drill the 4 Connecting holes on the 90 degree marks
- Mark one Connecting hole (on the backside) of every piece as you separate them (and remove paper template)
- Apply glue on the reverse side of the template masking areas to be reused (i.e.pinions)
- Position the transparent template, using the arbor hole as a guide, to the reverse side of the piece
- Cut wheel into an oversized circle
- Drill out teeth gap holes using paper templates the same way as steps 3-7
- Cut the teeth
- Sand teeth to the black line
- Cut out the spokes & sand
- Balance the wheels as per Wear test
- Test the meshing of the gears as per Wear test
- Overbore the arbor holes for 3/4s of its length from the back side.
- Harden all exposed MR MDF edges
Remember that the off-cuts holding the Pinion must remain large so that they can take the 3 temporary holding pins in the next set of steps, and reuse the template which was not stuck down. Actually I think it might be safer to have the Pinion template outside of the wheel, so that it can be cut off to ensure no glue gets on it before it is used in the next step.
Notes
Minute wheel / Ratchet
As the Ratchet forms the back piece to the Minute wheel, it must be made so that both top (sunny) sides are on the outside when they are joined - so place pieces in step1 accordingly.
This is a problem piece because of the drill throw, so the Minute Wheel sheet must be cut to rough size before starting.
Pawls
The above does not apply to the Pawls, which are not to have templates left stuck to them - so use non-permanent glue. This will give them a little clearance between the Minute wheel and the Drum End piece.
Use the temporary arbor to hold the Drum End piece and Ratcher (packing to remove play) and then drill the Pawl holding pins, on the 120 degree lines as a tight fit.
Drum
The small drill bit will only go through 3 layers at once. So repeatedly use the middle piece as the top piece for steps 1-8.
Overbore the drum piece holes after sanding
Crown wheel
Just use the paper template to drill the crown pin holes, in the same manner as the 90 paper template in steps 3-7.
Next page
.