Construction - Ratchet
I'm starting with this piece because it is the simplest, less critical part and I need to see if it will take the weight.
I used an old piece of 8.5mm MDF flooring - so that is MR MDF with hard veneer sheets on each face. Drilled the hole, applied repositioning Spray Mount and then positioned the paper template over it. This allowed me to align the hole accurately - probably better than drilling the hole when the paper had been stuck down.
My first mistake was that the glue entered the hole and will not be the easiest thing to remove. Therefore one must plug the hole before applying the adhesive.
I cut the pieces out on my scroll saw and found it extremely hard to cut to the outside of the template line and found I kept on hitting it - it will take some practice to keep a consistent distance from the line. I gave up with the Clicks and just cut to the line!
Removing the paper was very easy after putting the pieces in the microwave for 30 seconds.
There is an awful lot of play using a metric drill bit 0.5mm bigger than the shaft. I cannot believe this is correct, even though all the plans I've seen suggest a bigger drill bit size than the shaft. I can wrap around a 90gm piece of paper on the shaft before getting a non-sloppy fit.
I'm sure this should be reduced somehow. Note, in this close up of a click, you can still see a bit of glue in the hole - the shaft diameter is 3mm!
I thought I would experiment cutting a circle to test the Ratchet with. So (opposite) I have inserted a pin in a piece of wood that is clamped to the scroll saw table. All went well until I came around to the start of the cut and then it spiralled inwards and was not of course circular!
The blade flexed too much, in towards the centre.
This my Ratchet mk 1. The clicks nicely fell into the ratchet as the wheel turned, but they must be free to revolve on their shafts to do this.
Therefore the clicks must be thinner than the ratchet as a 'base' plate will be attached to the ratchet to stop the clicks falling off their shafts and the to keep the cord on the winding drum.
Alternatively a very thin spacer could be positioned under the ratchet. but this will mean that all the arbors will need this to line the wheels up correctly.
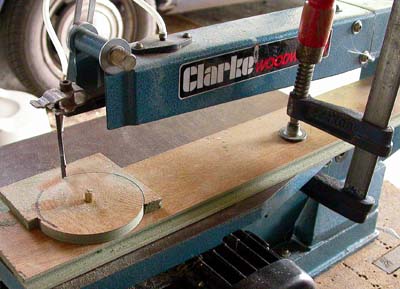
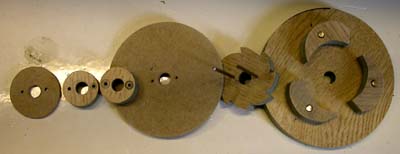
Well I cured the wandering blade problem - just did a half cut through some wood and then clamped that in position to stop the blade moving sideways. The circle I then cut, to make a sanding disc, was fine.
Here are the parts of the ratchet. Notice the 2 connecting pins in the ratchet which hold all the parts together instead of using glue.
I did not drill wee holes through the Drums (driving and winding) to attach the cord - that should have been done before cutting out!
And here is complete assembly with 4 lbs hanging on it. Pulling up 4 lbs was quite easy on the winding cord, so no problems there. I added a washer under the ratchet to make sure the clicks had plenty of free play.
What did I learn?
Well the ratchet clicking was smooth and faultless and I'm sure it could take a lot more weight than 4lbs - and I should only need 3 lbs. I must have a separator between the driving and winding drums to stop them interfering with each other.
I had two problems...
- I had drilled the Drum and the end pieces with a small bit to make it more accurate on the scroll saw and sanding disc to get them round (without any play on the shaft). But when I then drilled them out to their full size, not all the holes were perfectly aligned. So I must drill the correct size hole to start with and pad the holes with paper to remove any play while using the scroll saw and sanding disc.
- Drilling the holes for the 2 connecting pins was not easy, mainly because the drill bit was too small for the chuck and it kept slipping! But also it would only pass through 2 layers of wood, so extra inaccuracies were introduced as the assemble had to be done in batches. Also I did not mark anything, so it would only fit together one way and I had to ream the hole with the drill bit to get the correct clearance.
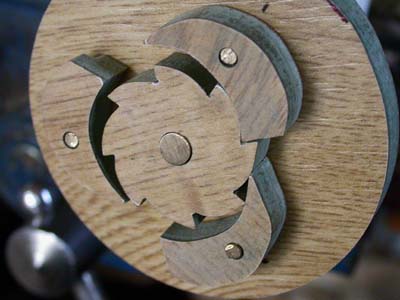
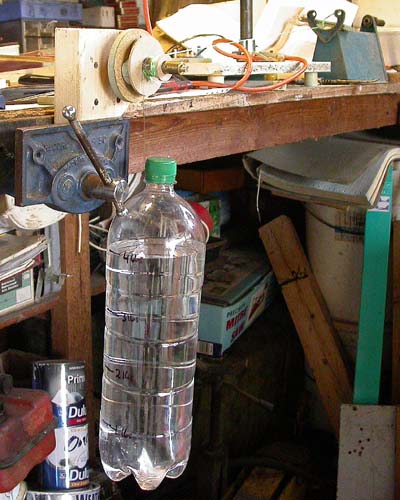
You may also notice that the ratchet is back to front compared to my design!!
This was an excellent exercise and shows that I must think things through before I start.
To summarise:- Drill the final hole size and in the 'right' order and Cover the hole while glueing the paper template.
I need to experiment with two other areas before I start for real.
- Friction and hole size. I really am worried about the amount of free play, although I realise that for the Great wheel, this will not matter as the weight will keep it aligned on one side of the arbor. I could use a 1/4" bit (6.35mm) instead of 6.5mm to reduce the play on a 6mm arbor. I will therefore try different arbor sizes in a simple pendulum piece of wood and see if there is any difference in the rate the pendulum slows down.
- Wood contact. I assume the more wood in contact with the arbor the greater the friction. Can I reduce the contact area, by drilling, say the Drum oversized as it will be supported by the end plates at either end. How quickly will a hole wear? So if I test a hole in a piece of MDF by supporting a weight (say 3 lbs) and revolve the shaft slowly, I can see how long it takes the hole to become oblong.
I also do not know how well the edges of MDF wear, so I need to think about how to test this and perhaps try some hardener and see if that increase the friction..
Next page
.